Wednesday, May 30, 2012

This Chair

I disliked this chair greatly when Jason and I first got married.  It belonged to his parents and I made him keep it in the basement.  It only came up to the living room when we had more guests than seats.  I realize this makes me sound really bossy, but the chair was a mess.  The old brown, decaying cushions were temporarily covered with floor pillow covers that were an avocado green in an effort to freshen it up a little.

Since we've slowly been fixing up our basement family room, we decided that fixing up this chair was kind of a priority.  I actually started working making new covers for the cushions months ago.  I had just bought my sewing machine and started on them right away but gave up for a few weeks out of frustration, because I really had no idea what I was doing.  I wasted a lot of thread and must have taken both covers apart at least three times before I finally got something that looks somewhat decent.  Sewing is not easy for me, folks!

Now, please do not expect perfection and don't look to closely.  After this project, I realize why furniture upholsterers get paid the big bucks.  They deserve it.


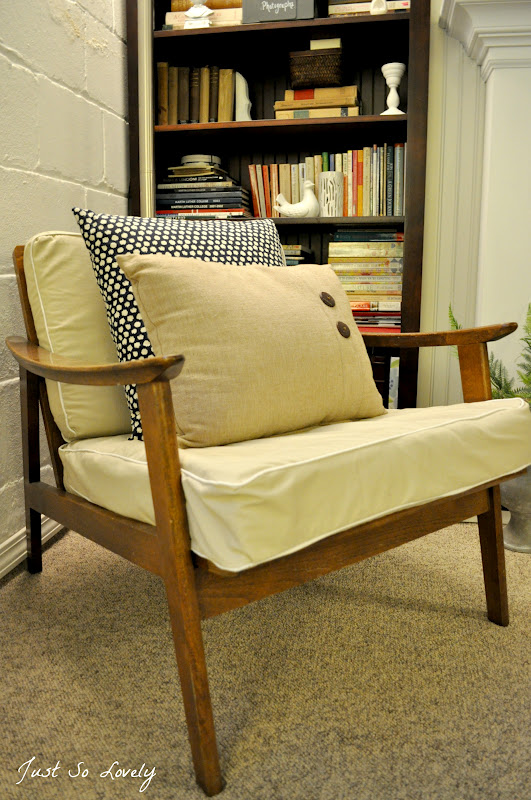
Maybe someday after I've improved my sewing skills a little more, I can make another attempt at some new covers.  For now though, thankfully this chair is done.

Friday, May 25, 2012

I've Joined the Club

I'm now an instagramming fool with my lovely little iPhone.  I adore it!  I love my camera, but this little phone allows me to capture picture opportunities I had previously missed.  My big ol' camera just doesn't fit in my purse or pocket as nicely as a phone does.  Here are a few of the pictures I've taken so far.


lunch on the swing set


my favorite chocolate cake ever


friday night sprinkler fun


lettuce from the garden


pretty purple flowers for my garden


friday night dinner


cherries


my little garden helper


movie night


some kindergarten practice for Henry-boy


a treasure from my boys
"Mom, this rock looks like buns!"
I'm saving this one, folks.  It is a treasure indeed.
.......................................................................................................................

If you'd like to follow me on Instagram, you can do so here.

And as long as we're talking about following me, you can follow me on Pinterest here.

I would sure appreciate it if you did!

Have a great weekend, all!

Monday, May 21, 2012

A Fresh Hallway Make-Over

We are in the process of painting all of the woodwork in our house a crisp, clean white.  So far, we've managed to complete the living and dining rooms as well as the bathroom.  Our small hallway is located in the middle of these three rooms and was our next project.


Before we get to all of the after shots, we'll begin with some before shots.  Do you want to know the sad part about this poor hallway? We never realized just how ugly and neglected it was until it was shown a little love.  If you looked closely, this space showed some abuse and age.  This next picture is the doorway into our kitchen.  A previous homeowner must have tried to put some wood filler in at some point, but to no avail.  This space really did take away from the beautiful, newly painted woodwork in the rooms we had already completed.


This project involved hours and hours (no, we're not kidding) of filling holes, gashes, and scratch marks with wood filler.  We then had to wait for the wood filler to dry, sand it smooth, and then sometimes repeat the process.  Surprisingly, this small space took a long time to prep before we could even think of priming and painting it.  

Around the kitchen doorway, Jason removed some of the moulding and replaced it with some extra found inside one of the closets in our house.  The old moulding was too damaged to work with.  The moulding from the closet fit almost perfectly.


There were quite a few gaps between the walls and door casings.  Filling them was important because we knew they would be even more visible after the woodwork was painted white.


To remedy this, we used some Dynaflex 230 Sealant.  We've used this product in other rooms of our house and it works great!


We filled nail holes and those pesky little knicks and scratches in the wood with Minwax Stainable Wood Filler and sanded them smooth after they dried.


We also had to deal with a few larger areas to fill in some of the woodwork.


To fill the larger holes, we used DAP Plastic Wood, which is stainable and sandable.


Here is what the DAP Plastic Wood looks like when it is dried and sanded.


Before we get to the good stuff, here are some "before" pictures of our sad, dark little hallway.


After a little elbow grease and some painting, this hallway is so much brighter!  The power of paint is really amazing!


Jason hung our bathroom door on a track so that it slides over the doorway instead of opening up into the bathroom.  When we first moved into our house, much of the bathroom was taken up with the bathroom door.  For awhile, we had it swing out into the hallway, but it was still obnoxious and took up what little space we had in the hall.  Now that the door is on a track along the wall, we claimed valuable space in the bathroom as well as in the hallway, and goodness knows we need it in our little house!  Jason plans on covering up the metal track with some woodwork, which will also help in stabilizing the track.  We also plan on adding crown moulding to match the living room, dining room, and bathroom.


We love the original hardware in our home.  It stands out so much more now with the white paint.


There was some extra space on this wall by the laundry chute because the bathroom door was hung on the track.  We decided to incorporate a picture gallery wall to liven up the space a bit.  The little gray dresser below the gallery wall holds extra towels and toiletries since our bathroom is so small and doesn't have much storage space.


The frames on this gallery wall are a mix of Target and thrift store finds.


Do you have a space you've re-done simply with a little work and some paint?  Please share!

Thank you for reading!

Tuesday, May 15, 2012

A Room for Two Boys: Some Updated Pictures

We've made a few small changes in Henry and Ollie's "big boy room."  We've also got a few more changes in the works, including finding a new rug, new light fixtures, new hardware on the dresser and desk, and perhaps a new paint color on the walls.  Here's what the room currently looks like when it is somewhat clean and organized.


The blue bookshelf is a garage sale find from Pottery Barn Kids a couple years ago.  The table and chairs were made by my dad and mom.


Our little Cape Cod has quite a few built in features, including these drawers, which come in handy in our small square footage home.


My dad made this tool box years ago and decided it was too nice for tools.  He gave it to me and it now houses the boys' favorite books.  It is one of my favorite parts of the whole room.


This light fixture has been here since we moved in and needs to be replaced.  I'm thinking a nice, bright pendant fixture will fit in quite nicely.


We are currently working on painting the downstairs woodwork and trim in our house to a nice, crisp white.  Someday, the woodwork and trim upstairs will be done as well.


I'm excited to make these last few changes to give my boys a happy room to play and rest in.  You can be sure I'll share the changes made along the way!

I'm linking up to: