Monday, May 21, 2012

A Fresh Hallway Make-Over

We are in the process of painting all of the woodwork in our house a crisp, clean white.  So far, we've managed to complete the living and dining rooms as well as the bathroom.  Our small hallway is located in the middle of these three rooms and was our next project.


Before we get to all of the after shots, we'll begin with some before shots.  Do you want to know the sad part about this poor hallway? We never realized just how ugly and neglected it was until it was shown a little love.  If you looked closely, this space showed some abuse and age.  This next picture is the doorway into our kitchen.  A previous homeowner must have tried to put some wood filler in at some point, but to no avail.  This space really did take away from the beautiful, newly painted woodwork in the rooms we had already completed.


This project involved hours and hours (no, we're not kidding) of filling holes, gashes, and scratch marks with wood filler.  We then had to wait for the wood filler to dry, sand it smooth, and then sometimes repeat the process.  Surprisingly, this small space took a long time to prep before we could even think of priming and painting it.  

Around the kitchen doorway, Jason removed some of the moulding and replaced it with some extra found inside one of the closets in our house.  The old moulding was too damaged to work with.  The moulding from the closet fit almost perfectly.


There were quite a few gaps between the walls and door casings.  Filling them was important because we knew they would be even more visible after the woodwork was painted white.


To remedy this, we used some Dynaflex 230 Sealant.  We've used this product in other rooms of our house and it works great!


We filled nail holes and those pesky little knicks and scratches in the wood with Minwax Stainable Wood Filler and sanded them smooth after they dried.


We also had to deal with a few larger areas to fill in some of the woodwork.


To fill the larger holes, we used DAP Plastic Wood, which is stainable and sandable.


Here is what the DAP Plastic Wood looks like when it is dried and sanded.


Before we get to the good stuff, here are some "before" pictures of our sad, dark little hallway.


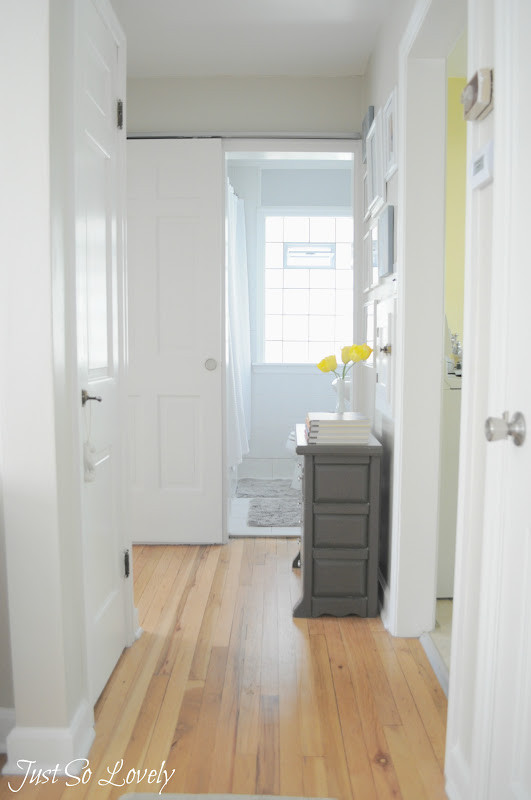
After a little elbow grease and some painting, this hallway is so much brighter!  The power of paint is really amazing!


Jason hung our bathroom door on a track so that it slides over the doorway instead of opening up into the bathroom.  When we first moved into our house, much of the bathroom was taken up with the bathroom door.  For awhile, we had it swing out into the hallway, but it was still obnoxious and took up what little space we had in the hall.  Now that the door is on a track along the wall, we claimed valuable space in the bathroom as well as in the hallway, and goodness knows we need it in our little house!  Jason plans on covering up the metal track with some woodwork, which will also help in stabilizing the track.  We also plan on adding crown moulding to match the living room, dining room, and bathroom.


We love the original hardware in our home.  It stands out so much more now with the white paint.


There was some extra space on this wall by the laundry chute because the bathroom door was hung on the track.  We decided to incorporate a picture gallery wall to liven up the space a bit.  The little gray dresser below the gallery wall holds extra towels and toiletries since our bathroom is so small and doesn't have much storage space.


The frames on this gallery wall are a mix of Target and thrift store finds.


Do you have a space you've re-done simply with a little work and some paint?  Please share!

Thank you for reading!

Tuesday, May 15, 2012

A Room for Two Boys: Some Updated Pictures

We've made a few small changes in Henry and Ollie's "big boy room."  We've also got a few more changes in the works, including finding a new rug, new light fixtures, new hardware on the dresser and desk, and perhaps a new paint color on the walls.  Here's what the room currently looks like when it is somewhat clean and organized.


The blue bookshelf is a garage sale find from Pottery Barn Kids a couple years ago.  The table and chairs were made by my dad and mom.


Our little Cape Cod has quite a few built in features, including these drawers, which come in handy in our small square footage home.


My dad made this tool box years ago and decided it was too nice for tools.  He gave it to me and it now houses the boys' favorite books.  It is one of my favorite parts of the whole room.


This light fixture has been here since we moved in and needs to be replaced.  I'm thinking a nice, bright pendant fixture will fit in quite nicely.


We are currently working on painting the downstairs woodwork and trim in our house to a nice, crisp white.  Someday, the woodwork and trim upstairs will be done as well.


I'm excited to make these last few changes to give my boys a happy room to play and rest in.  You can be sure I'll share the changes made along the way!

I'm linking up to:

Mother's Day in a Nutshell


1:  Traditional Mother's Day pictures after church.
2:  Progress on making bigger, better, and stronger raised garden beds.  Here's to more vegetables!
3:  S'more face.
4:  The umbrella and chimney fire pit made an appearance on the patio!
5 and 6:  Little boy antics.
7:  I made some new herb markers.  I used this method found via Lemonade Makin' Mama.
8:  Henry found work as a tow truck driver.
9.  Mother's Day steak on the grill.  Divine.

My boys gave me their gifts, all wrapped up in their little blankies.  I got my most favorite Sharpie pens, a new pizza wheel for family pizza night, and guys, TOMORROW I'M GETTING AN iPHONE!!!
It was a good day and I'm very thankful.

Monday, May 14, 2012

Happy Mother's Day!

God has richly blessed me beyond measure.  I'm so thankful to be "Momma" to my Henry and Oliver.


"The Lord has done great things for us, and we are filled with joy."  Psalm 126:3

Thank you Mom, for being such a wonderful example of how a wonderful, God-fearing mom should love and teach her children.  I couldn't have asked for a better example than you.  I'm thankful for you.  Simply put, you're the best!

Thank you, Carol, my wonderful mother-in-law, for raising a wonderful son who loves his Savior, first and foremost.  I will forever be grateful to you for teaching my husband to be humble, understanding, and loving.  He's a wonderful example for our boys!

I hope you had a wonderful Mother's Day!

Thursday, May 10, 2012

Paper Party Lantern

In our family, we have quite a few birthdays in the spring and early summer.  That means a couple of things.  There is a lot of shopping that needs to be done.  Presents need to be wrapped and, oh, how I love wrapping presents!  Then, there's the decorating!  Decorating for a birthday is fun!  However, decorating for a party doesn't mean you have to go out and buy balloons, streamers, and other fancy things.  You can make your own fancy things!  You can make paper party lanterns!  

Let me show you how.


You will need to gather your supplies:

12 inch x 12 inch paper (having print on both sides makes the lanterns extra special)
Ribbon
A hole punch
A pencil
A stapler
A ruler
Scissors


See?  This paper is double-sided.  Fancy, indeed.


Fold the paper in half.


On the fold, make a mark every 1/2 inch.


Using the ruler and your pencil, extend the mark, stopping at about a half inch before the edge of the paper.  You don't want to your line to go all the way to the edge.


Cut along the line.


Open up the paper.


Beginning at the bottom, start rolling up the paper.


Staple the edges together at the top and bottom.


Punch two holes on the opposite top sides of the paper lantern and thread the ribbon through the holes.  Hang your lantern and pat yourself on the back for a job well done!


I can imagine many uses for these lanterns.  For example, making them out of vellum and hanging a bunch of them in a lit tree would make for a magical evening, outdoor party.  Or, making some in various sizes and in soft pastels would be pretty for a baby shower.

Thank you for reading!

I'm linking to: