Showing posts with label Decorations. Show all posts

Monday, May 21, 2012

A Fresh Hallway Make-Over

We are in the process of painting all of the woodwork in our house a crisp, clean white.  So far, we've managed to complete the living and dining rooms as well as the bathroom.  Our small hallway is located in the middle of these three rooms and was our next project.


Before we get to all of the after shots, we'll begin with some before shots.  Do you want to know the sad part about this poor hallway? We never realized just how ugly and neglected it was until it was shown a little love.  If you looked closely, this space showed some abuse and age.  This next picture is the doorway into our kitchen.  A previous homeowner must have tried to put some wood filler in at some point, but to no avail.  This space really did take away from the beautiful, newly painted woodwork in the rooms we had already completed.


This project involved hours and hours (no, we're not kidding) of filling holes, gashes, and scratch marks with wood filler.  We then had to wait for the wood filler to dry, sand it smooth, and then sometimes repeat the process.  Surprisingly, this small space took a long time to prep before we could even think of priming and painting it.  

Around the kitchen doorway, Jason removed some of the moulding and replaced it with some extra found inside one of the closets in our house.  The old moulding was too damaged to work with.  The moulding from the closet fit almost perfectly.


There were quite a few gaps between the walls and door casings.  Filling them was important because we knew they would be even more visible after the woodwork was painted white.


To remedy this, we used some Dynaflex 230 Sealant.  We've used this product in other rooms of our house and it works great!


We filled nail holes and those pesky little knicks and scratches in the wood with Minwax Stainable Wood Filler and sanded them smooth after they dried.


We also had to deal with a few larger areas to fill in some of the woodwork.


To fill the larger holes, we used DAP Plastic Wood, which is stainable and sandable.


Here is what the DAP Plastic Wood looks like when it is dried and sanded.


Before we get to the good stuff, here are some "before" pictures of our sad, dark little hallway.


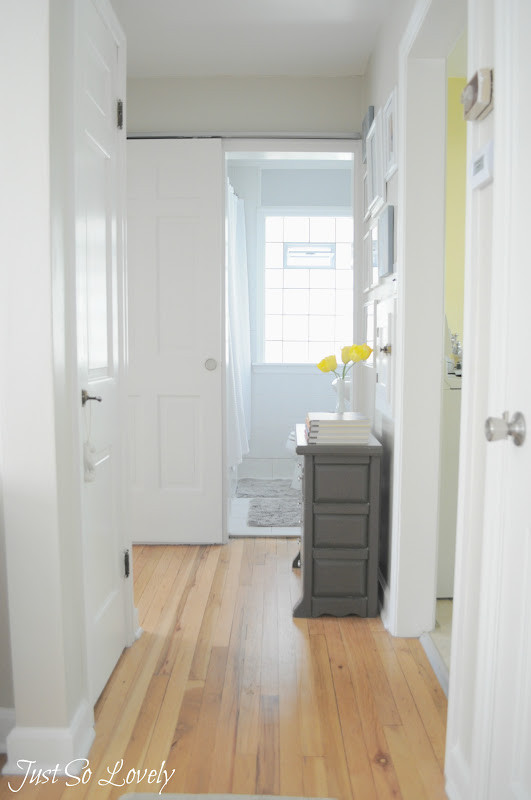
After a little elbow grease and some painting, this hallway is so much brighter!  The power of paint is really amazing!


Jason hung our bathroom door on a track so that it slides over the doorway instead of opening up into the bathroom.  When we first moved into our house, much of the bathroom was taken up with the bathroom door.  For awhile, we had it swing out into the hallway, but it was still obnoxious and took up what little space we had in the hall.  Now that the door is on a track along the wall, we claimed valuable space in the bathroom as well as in the hallway, and goodness knows we need it in our little house!  Jason plans on covering up the metal track with some woodwork, which will also help in stabilizing the track.  We also plan on adding crown moulding to match the living room, dining room, and bathroom.


We love the original hardware in our home.  It stands out so much more now with the white paint.


There was some extra space on this wall by the laundry chute because the bathroom door was hung on the track.  We decided to incorporate a picture gallery wall to liven up the space a bit.  The little gray dresser below the gallery wall holds extra towels and toiletries since our bathroom is so small and doesn't have much storage space.


The frames on this gallery wall are a mix of Target and thrift store finds.


Do you have a space you've re-done simply with a little work and some paint?  Please share!

Thank you for reading!

Wednesday, November 2, 2011

Filled with Joy

Normally after Halloween I get in my Christmas mode and sort of forget about Thanksgiving.  I still am thankful and celebrate and indulge in all things delicious, don't get me wrong!  This year I wanted it to be different.  I wanted to embrace this holiday that I usually don't even decorate for and try my hand at some Thanksgiving crafts, recipes, and projects.   I had been seeing these lovely "Thankful Trees" all over Pinterest and got a lot of inspiration.  I was excited to make one for myself and my little family.  After all, we are truly blessed!  When Katie Bower and friends mentioned on their blogs about the second round of the Pinterest Challenge, I decided I would join in!  I began by taking some branches that I found outside and spray painted this spring and moved them into the dining room.


I gathered all of the supplies that I thought I would need for this project.  I was winging it, so I wasn't really sure what I would end up using!  My supplies included:  jute, some glitter, glue, gray and white card stock, a hole punch, scissors, a ruler, and some string (I actually used burlap that had come off of my tablerunner). 


To begin I cut strips of paper that were 1''x3''.


To make the paper strips more decorative, I made a little "v" at the end of each strip of paper.


I used the hole punch to make a hole and then tied some jute at the end to make a loop.  I tried knotting the jute at the top of the loop, but it was too large and looked messy.  I used my leftover burlap to tie the ends of the jute together.


I repeated this process for awhile until I had a nice little pile of paper strips.


To add a little more visual interest to the strips of paper, I put some glue on the bottom of the "v" and sprinkled on some glitter.


After the glue dried, I set down with a cup of coffee and set to work writing some blessings onto each strip of paper.  I didn't do them all because I do want to take the time to write one down each day with all three of my boys, even though I was tempted to!


I put the extra strips of paper into a glass with a pen right under the thankful tree.


Our thankful tree is already pretty full!  My little family and I have been richly blessed.  In all honesty though, this tree should be covered in jute and gray card stock.  God does so much for us every day.  I am filled with joy!


Please make sure you visit all of the other ladies who are hosting this fun Pinterest party!  I've already seen their projects and they are amazing!  Thanks for hosting, ladies!


I'll also be linking up to these fun link parties!  Please visit them as well!


Please Join My Link Party!

Stay tuned for the finished pictures from our wine cellar!  I can't wait to show you!

Thursday, October 20, 2011

Our Spoooooky Table

This is my "I wish I had a fireplace mantel to decorate but, alas, I do not" table.  Maybe in our next house we'll have one.  I'm putting that on top of the ol' priority list for our next home.  Not that we're moving anytime soon, because we're not.  I'm just sayin' I want a fireplace.

Anyway, I have never really decorated for Halloween before.  Then I had two little boys who adore things like mice, spiders, and all things spooky.  I guess that nursery rhyme about snails and puppy dog tales is true.  So, to please my boys, I bought some Martha skulls from Michaels and some spiders and webs from Target.  I added those things to my crows from Pottery Barn and Michaels and went to town on this table in our dining room.


Can you see the reflection of my pants in this picture?  Yes, those are white sweatpants.


Henry and I made those bats together the other day upon his request.  We hung some from the ceiling, taped some to the wall, and taped one to the mirror.  He was pretty pleased with his contribution.


I hope you enjoyed a peek at our first go at a spooky table! 

I'm linking up to:

one of my most favorite blogs!